Step 1 – Choose an Agent
Buying property either as an investment or your home is most likely one of the biggest investments of your life. Take the time to educate yourself so that you understand how the current real estate market will affect your particular situation. Choosing the right agent is key – they should know the local market and you should feel confident that they’ll be able to give you the time and attention you need.
Step 2 – Initial Meeting/Consultation
After selecting your agent, you/we will want to schedule a sit down meeting. At this time you/we can officially meet (if we haven’t already!).
You don’t want to skip this step. It will be virtually impossible to properly represent you without having actually sat down to discuss things, as they fit your unique situation. Once we have assessed your situation, know your goals, we can determine an appropriate action plan so we can confidently move forward.
Please click on the link to complete the form with our initial questions.
Step 3 – How are you going to pay for it?
There is nothing but options when it comes to financing, but you should have a good idea of how you will purchase your next home or in investment property before you get too committed to looking. There are three main sources of financing
- Mortgage Brokers – They have the most options. They can use most of the major banks, plus many other lenders. They will be your best bet to truly finding the best option for your particular situation. We have great brokers that we’d love to recommend!
- Traditional Banks – If you already have a great rapport with your current bank, this is a good option.
- Creative Financing – The options here are endless and are great for investing, or if you cannot access a mortgage through the banks or mortgage brokers.
** OTHER COSTS TO CONSIDER WHEN PURCHASING IN TORONTO **
- Land Transfer Taxes: Ontario Land Transfer Tax and the Toronto Land Transfer Tax. (Please note that there is some relief for first-time buyers)
- CMHC Insurance Premium – If you put less than 20% down, the Canadian Mortgage and Housing Corporation (CMHC) will charge you a premium on your mortgage insurance.
- Legal Fees: Fees vary depending on the lawyer you use
- Other fees you need to consider, but may not be necessary depending on your situation are:
- Home inspection
- Title insurance
- Utility service deposits
The CMHC has a great, detailed guide to check out – Homebuying Step by Step: Everything you need to buy a home in Canada. RECO also has a simpler article for you to check out concerning the full cost of buying a home.
Step 4 – Start the Search
This is the fun part! You already know the type of home you’re looking for and the price you can afford. A property search will have be set up to notify you when a new property enters the market that matches your criteria. When you see any potential properties that pique your interest, it’s time to go on a tour!
Initially the tours, will be educational to see what you like or you don’t like (you may be surprised at what you learn about yourself – often times needs and wants turn out to be different after seeing a few properties). After this initial educational period, we’ll have a concise list of your needs, wants and goals and can streamline the viewing process so that you don’t need to see hundreds of homes.
Step 5 – Make an Offer!
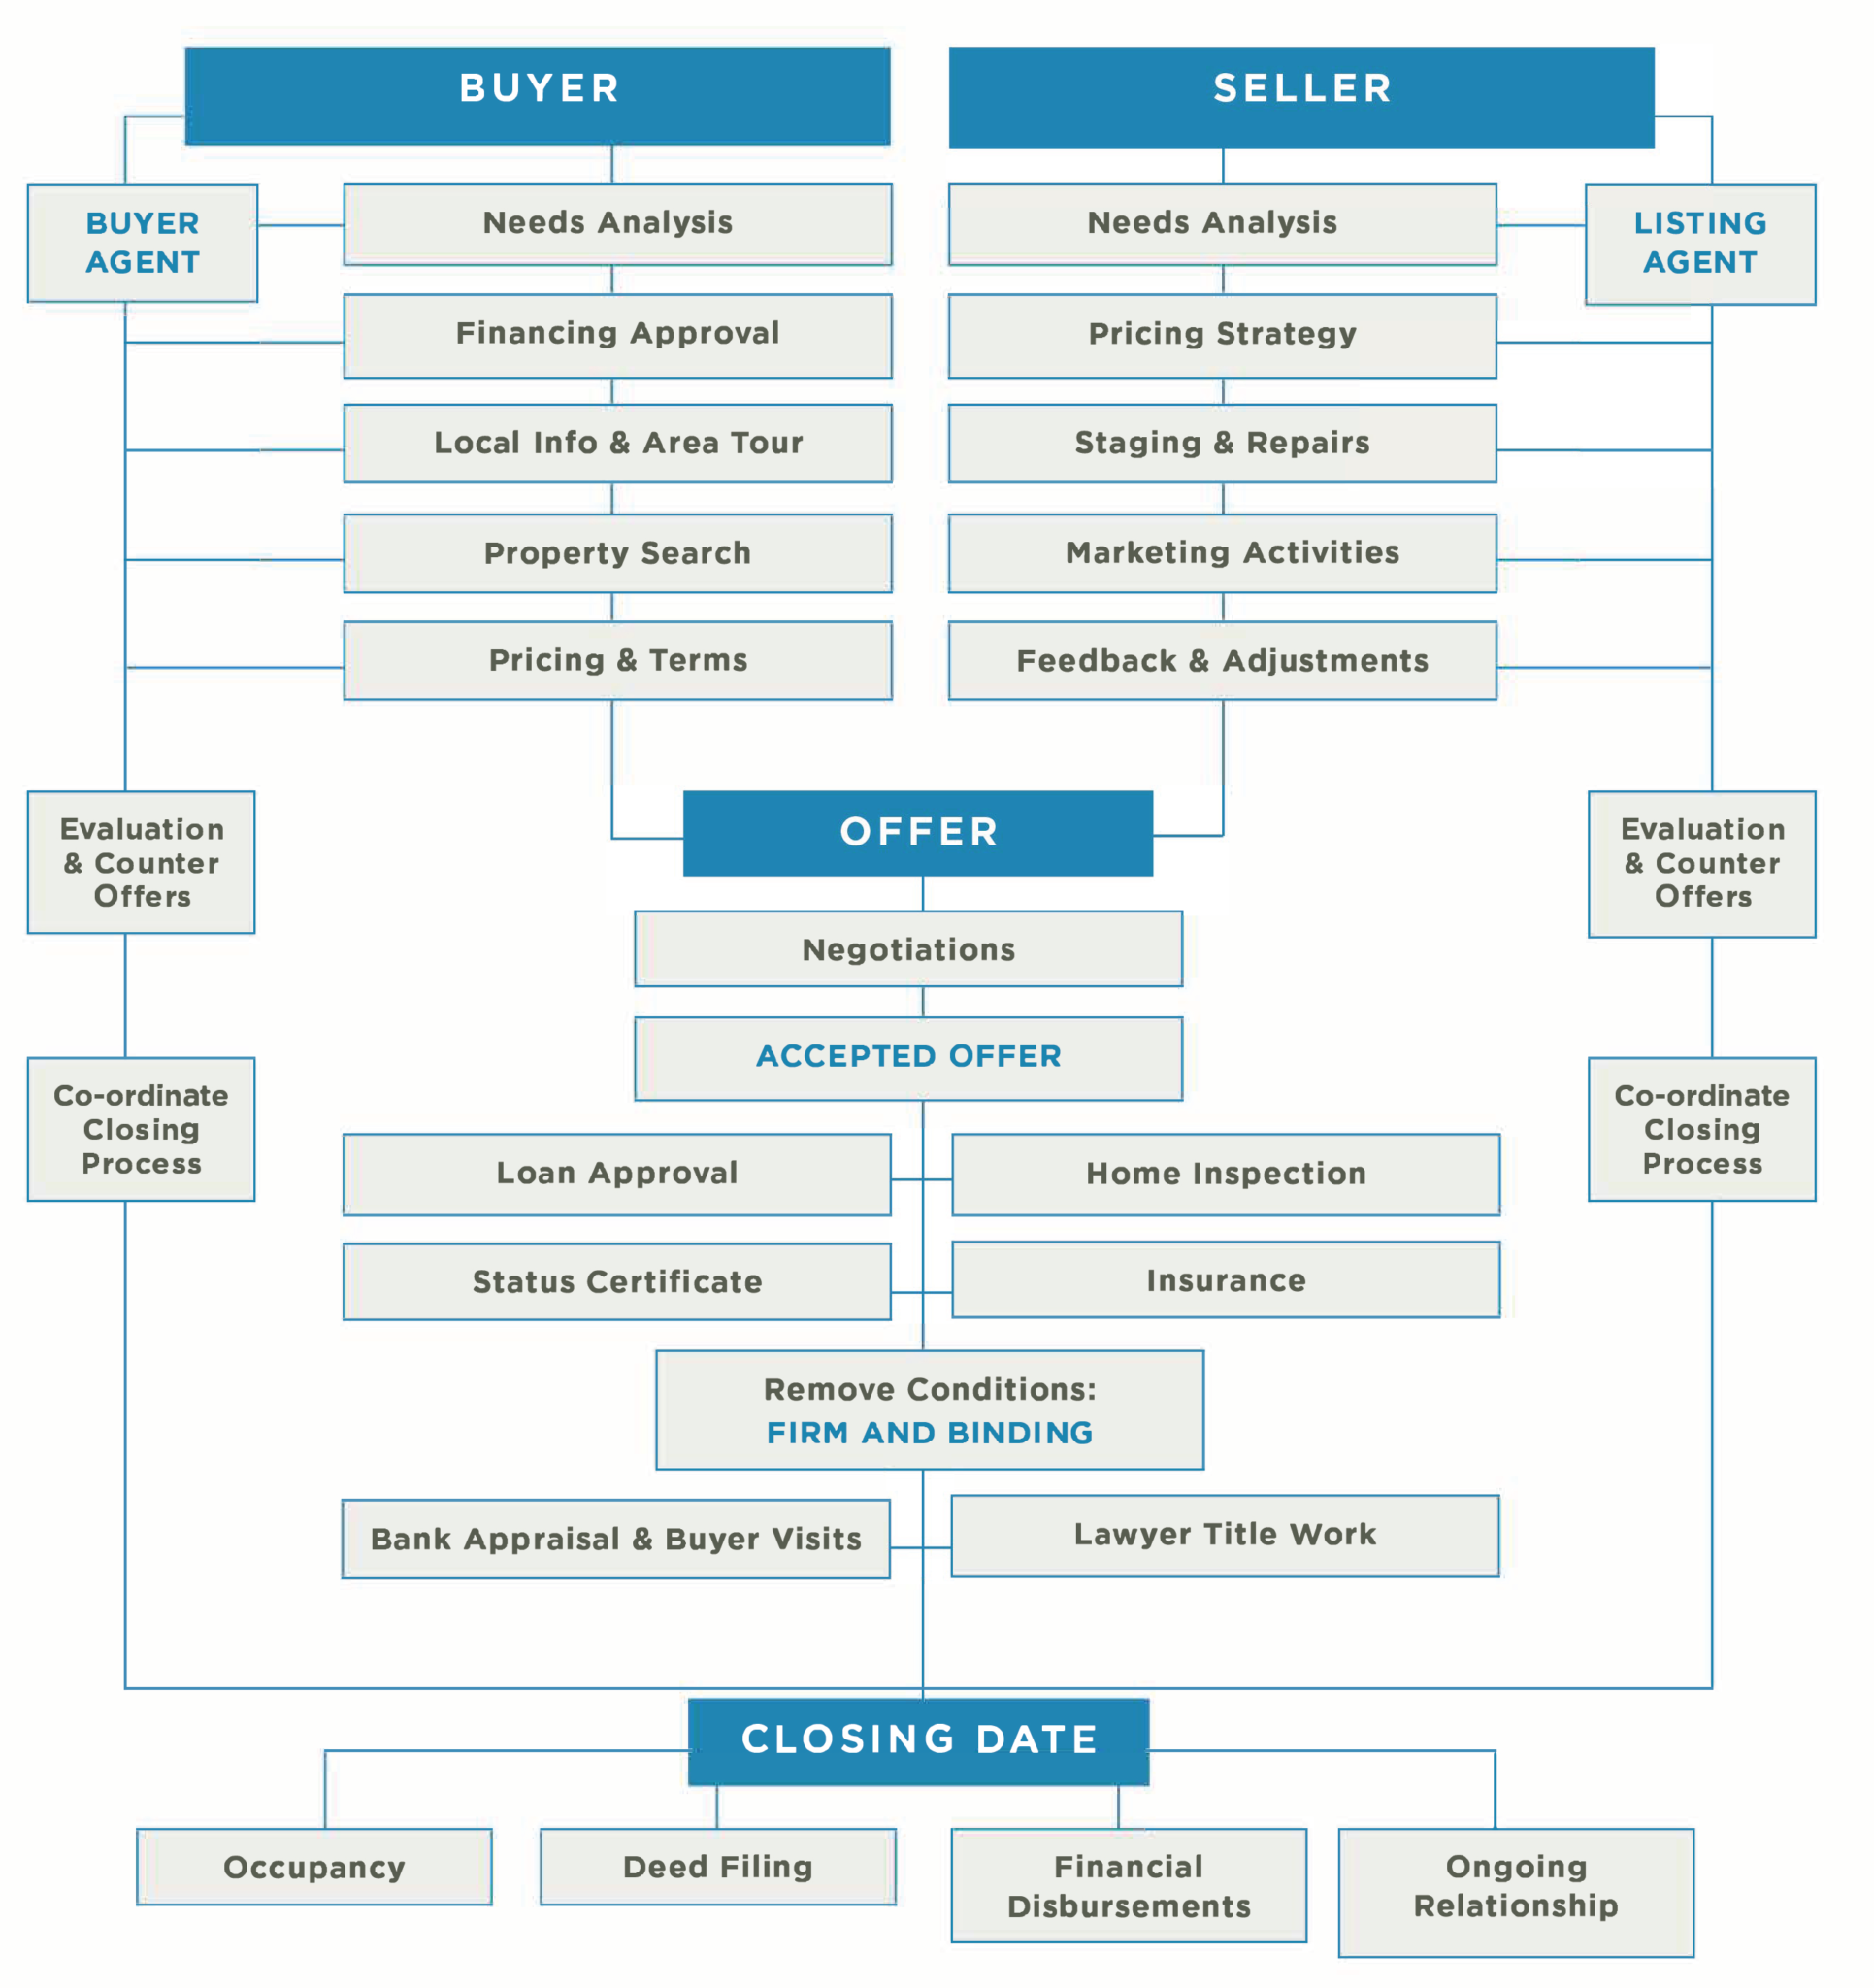
Once you have found a home that will suit your needs, the next step is to prepare and present an offer. There are several steps that have to be taken when you write your offer:
- Property Research/Comparables – This is where you investigate the selling history of the home and also where the price is relative to the market. To do this, an assessment of the current homes on the market and properties which have recently sold will have to be done.
- Terms – Terms are the clauses that make up the contract. These are the items that are agreed to and will be upheld, otherwise there is a breach of contract. In addition to the standard terms that will be reviewed with you when preparing the offer, you can add in whatever else you need to, however, these are open for negotiation.
- Conditions – Conditions, on the other hand, are clauses in the contract that must be fulfilled in order for the transaction to even proceed forward. Typical conditions are for a home inspection, or for the buyer to be approved for financing. The buyer or seller is then given a few days to fulfill the conditions (typically 3 to 7). This is what it is meant when we say a property is conditionally sold. If something happens where either the buyer or seller are not satisfied with the results of their trying to satisfy their conditions, then they may walk away from the contract at no cost and with no further obligation (deposit cheques are returned). Conditions are most commonly for the buyer, but you may have a seller’s condition as well.
- Deposits – In order to write an offer, you will need a certified cheque and some available money for a deposit. This is initially a show of good faith in a transaction and is fully refundable if the conditions on the purchase are not removed. After the conditions are satisfied and removed in writing, the deposit becomes the seller’s security that you will complete the purchase (non refundable). We usually recommend 5% of the purchase price.
- Price – There are only two things that are negotiable in a real estate transaction, price and terms. Once you know what terms and conditions you would like on the contract, and have completed your property research, you can now effectively determine the appropriate offer price. The offer price will be determined based on all the variables affecting this specific property. What terms do we need? How many offers are there? How long has the property been on the market? And many, many more. We will not be discussing negotiating strategy here, but remember this: What unique way can we meet the seller’s needs and still achieve our goals. This isn’t always strictly involving price.
- The Offer Presentation and Acceptance Procedure – After the offer is written and signed, it is the agent’s job to present the offer to the seller. This will typically happen one of two ways. First, if the seller is available, the offer can be presented in person or directly to the owner of the home. The listing agent will be there to represent their client. An alternative method is to email the offer. This means that you will need to be accessible by phone for negotiations to occur. Once a counter offer is received, or the offer is accepted, all parties will now need to sign the documents.
Step 6 – Satisfy Conditions (if there are any!)
Once the offer is accepted, it is time to proceed with satisfying your conditions. This process usually involves arranging and performing a home inspection, getting all your personal information and the property information to your mortgage broker or bank, or simply doing research to gather whatever information is required. As real estate professionals, we play a huge role in gathering this information and making the necessary arrangements to ensure the process continues to run smoothly.
After the necessary information is verified, a decision to proceed (or not) is made, and the appropriate written notice is provided to the seller and their agent. Once the conditions are removed, the sale is considered “firm” and the property will be marked as sold”.
Step 7 – Preparing for Possession
Typical possessions are 30 – 90 days. Get the following items completed as fast as possible, as this will alleviate a large amount of stress
- Lawyers – You may have already chosen your lawyer at this point, however if you haven’t, it is now mandatory that we know who will be handling the transaction. Once you have a lawyer chosen, they will need all the required paperwork prior to you meeting with them. This is usually handled by your agent to ensure they get absolutely everything they need. You will be meeting with the lawyer about a week before you take possession and will need to provide your insurance information, the balance of your down payment, payment of fees, payment of any adjustments or taxes, sign documents, and finalize anything else that is required before you own the home.
- Down Payment – If your down payment is not readily available, make the necessary arrangements to obtain it. You may need to transfer money, cash in bonds/stocks, or move money in another way. It is important to note that liquidating certain assets can take upwards of 30 days, be sure to consult your Bank or Mortgage Broker about this.
- Movers – If you are using professional movers, book early. Busy seasons for movers can be unusual! Once again, we do have movers we can recommend so if you need one, just ask.
- Insurance – When you actually meet with the lawyer they will ask to see a copy of your insurance, as it is a requirement of the mortgage. . This step usually involves a simple phone call and/ or a lengthy survey. Have a copy of the MLS listing available with all of the specifications of the home on it. Be prepared to answer questions regarding the age of the house, furnace, electrical system and roof, as well as general questions regarding square footage and the features.
- Utilities – When you take possession of your new home it is very important to change your utilities over to your address in advance. This includes your phone, cable, internet, power, water, and gas services. Also, don’t forget to cancel the utilities at your previous residence.
- Mailing Address – This is can be a tedious task but it is a necessary evil. Gather all of your bills, statements, tax information, healthcare information, anything you make automatic payments on, subscriptions, clubs or organizations in which you belong, etc. Once you have the list compiled, get on the phone/log on to the internet and begin giving out your new mailing address and the date you will be taking possession or moving in. You might also want to have your mail forwarded, through the post office, for anything you may have missed.
Step 8 – Buyer Visit
We write in buyer visits into your agreement of purchase and sale so that you can have the time to plot out where your furniture will go, arrange for any professionals you may have coming in to do future work (contractors, interior decorators etc…). We also recommend using one of the visits just before your closing day so that you can do a complete walkthrough of the property. At this time, we can look around the home and make sure that everything is as it was agreed to be in the contract. The typical things to look for is damage from moving, and things that don’t work when it was agreed upon that they would (appliances, furnace, etc). If there are any issues, we notify the lawyers so that they can be resolved and you can close on time/as planned.
Step 9 – Closing Day
Closing or possession day is, surprisingly, not as big of a deal as people expect it to be. We’ve already done the property inspection and you’ve already met with your lawyers a few days before closing to sign all the necessary paperwork so your task will be once you receive notification from your lawyer that your deal has closed to go and pick up your new keys!


